Oil has been consolidating since 2016 in the $40-$55 range after having fallen steeply from the $147 a barrel high set in 2008. At the end of last week it had just peeked above the previous consolidation high posted in early December 2016. On the longer timeframe Bigger Picture weekly chart below, oil is still in a downtrend, as indicated by the falling moving averages.
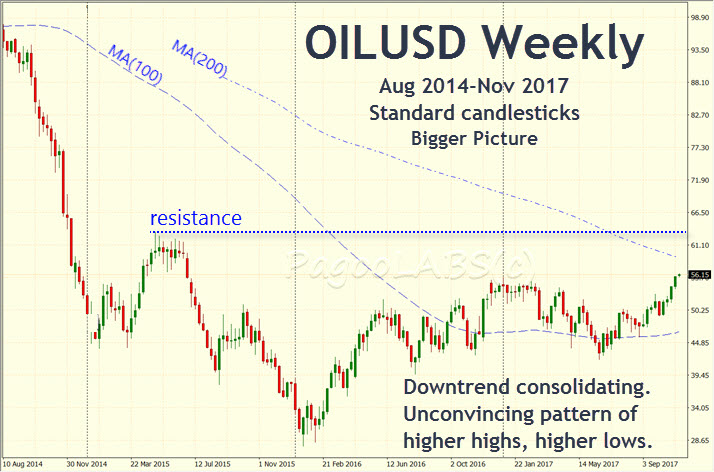
Based on the recent breakout above the trading range, either the downtrend is ending or a bigger upward correction is underway. We don't know which at this stage. And we do not have to know because we will not be trading against the weekly trend until any uptrend, if it exists, reveals itself in the market.
On the fundamental side, we have a steadily improving world economy, stronger than expected numbers coming out of the USA and a renewal of tensions with Iran. It's interesting to note that Iranian tensions were also flying high during the last peak in 2008. Of greater concern, some unexpected turmoil is emerging from Saudi Arabia, a key oil producer. It's early days yet but it appears that any Saudi policy that might have existed of depressing oil prices to drive USA frackers out of business, has come to an end.
Each of these developments is oil positive, but should we trade against the longer term falling prices?
The answer is to never trade against the trend. Instead I will pull back to a shorter timeframe that concentrates more chart space around these recent developments. I am going to drop down two standard timeframes from the weekly to explore the effects of applying our simple system method to the four hour (H4) chart. In this shorter timeframe, shown below, oil is showing a distinct uptrend, in line with recent fundamentals. We should be cautious here because the longer term chart is still considered a downtrend until at least the $63 high from May 2015 is taken out and the MAs trend up or cross.
To demonstrate this sample system in the oil market, I will be using the Heikin Ashi reversal technique (HA). However, as in our earlier stories, I am not wedded to any one signaling technique. Feel free to use MACD, crossing moving averages or your own favorite indicator if you wish. You can follow along with our discussion here as you apply your custom signals to the same charts. Everything presented here is done as simply as possible for learning purposes only. I encourage you to go out and apply these general techniques to developing your own system.
The H4 Oil Chart
In the earlier series on Systems I used a moving average cross of the MA(100) and MA(200) to mark the start of a trend. There are better trend methods but I will stick to the MA cross here both because I have already explained how they work and because crosses are easy to demonstrate. Once a trend has started we will open a position whenever our signal fires, as long as our system's conditions or filters are met.
To signal our entry into a trade I will use the Heikin Ashi reversal technique which we discussed in the earlier series. The HA method is an easy signal to show on a chart because of the changing color of the candles.
The HA bars are really just averages of today's and earlier prices so they smooth over the little period to period wiggles in the standard bars. As a result, they differ from the more standard candlesticks so, to help you become familiar with them, I present two charts below. The first has standard candlesticks and the second, which is marked up with setups, has the HA bars.
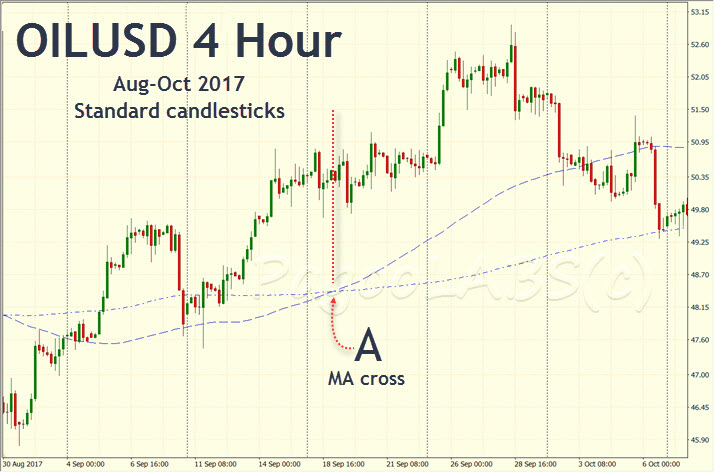
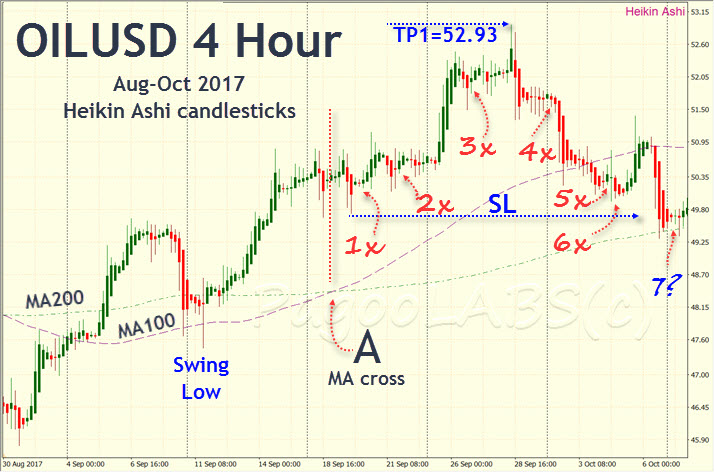
The signals emitted when a HA bar changes color are marked on the above H4 Oil chart. I have filtered out HA reversals that did not come after a countertrend retracement of at least two bars. Also excluded are reversals where the retracement did not move back against the prevailing trend. We are only interested in HA signals where we can say the market appears to have rejected lower prices, so inside bars don't count. These signals are marked 1 to 7 on this first set of charts, shown above. They are further annotated with an x if the setup fails, a ✓ if it wins or a ? if it's unclear for whatever reason.
The rules for calculating how much of your funds to allocate and the number of contracts to open were discussed in the series on The Basic Setup and if you haven't yet read that series, now is a good time to have at least a quick look. The math is presented in tabular form here if you need a reference.
I will keep this presentation simple by assuming we are allocating 1% risk capital to this trade and expecting a risk-reward multiplier of four (RR=4). So any loss would be -1% and a win +4%. Scale up accordingly if you are an experienced trader risking 2%.
We will start mechanically trading our system at the time period where the faster MA(100) crosses above the slower MA(200), or point A in the charts above.
The first thing to note is there was a string of losses until the end of the period shown on the chart. However, the beauty of the systems approach is about to reveal itself, so don't give up just yet!
Although the first trade does not look like a confident setup, a system will require you to open it anyway. That's because you are following a mechanical program that you designed in the earlier systems and simulation step. In this case here, we have decided the trend is up after point A, the MA cross, and we are taking every signal (HA reversal) that follows the rules we have set ourselves.
In your case you may have different criteria for establishing the beginning of a trend and a different signaling method, such as MACD. In addition you will have filters that ignore certain poor setups. In our case, our filters will be:
- the retrace must include at least 2 bars of the opposite color
- the retrace must involve the market falling and not simply a sequence of inside bars
- we must not expose ourselves to more than 1% risk in the trade, so once fully invested, we open no new positions until it's closed.
Setup #1
Unfortunately for us, the setup #1 in the chart above meets those criteria so, weak or not, we open it. The consequence though is that until that first position is stopped out in the price fall down to setup #7, we conveniently miss the other failed setups. That is, we are already fully invested from setup #1 and we don't want to take on more than 1% risk in this trade. What looks like a string of losses becomes just one loss.
But was it really a loss? Let's look at the setup in detail:
Setup #1
SL = 49.70              Stop Loss
OP = 50.40              Open Price
Contract Risk = CR
CR = TP - SL            Contract Risk
   = 50.40 - 49.70
   = 0.70               Risk per contract
Target Price = TP
TP = OP + RR x CR       win of 4 x Risk
   = 50.40 + 4 x 0.70
   = 53.20
Highest price (bid) before stopped:
Max = 52.93
Cumulative win (-loss)
Win = -1%
The trade climbed $2.53 from the open, falling just shy of the $2.80 we set as our TP based on a four times risk-reward. Depending on the price you opened in the market and your broker's bid-ask spread, these numbers could be a little different in your case. All our calculations here take into account a wide bid-ask spread, although wider ones exist. Don't worry yourself over those differences, just print your own charts and use the prices and the specific oil contract that is relevant to you. You may find though with the tighter bid-ask spreads you face that this trade actually hit the TP.
In this story, however, we want to be as sceptical as possible toward the system so we are marking it down as a failure. Had it worked, the system would require that we take the next three failed trades but we would approach setup #7 being 1% up instead of 1% down.
You will come across well-meaning advice criticizing you for not selling with so much profit already in the trade. The reality is you do not know the future and you do not know at any point whether the trade will work out favorably or not. You should already have determined the appropriate RR multiplier to use from the earlier systems simulation step.
Clearly, the lower you set RR the more likely you are to win. But you will still face losses of 1% for every failure and those losses have to be overcome for the system as a whole to win. Winning one setup with 1.5% but losing the next two at -1% each will steadily empty your account. Also, choosing an RR that keeps you out of other failed trades so that you only lose one instead of many, as we did here, is an advantage in itself.
Your best approach is to calculate the relevant SL and the optimal RR to use for each trade and stick to them.
If you feel tempted to move your stops or target price during the trade, try it first in a demo account and watch your system fail. Don't try it with real money. Never forget you are competing in the market with a huge number of very competent and determined traders. It is their job to shake you out of your trade. You will only win by taking on risk and part of that risk is to hold on to your plan and stay in the trade even while the market is delivering you a drubbing. Ride that bucking bronco and don't get shaken off. No one likes to lose but here you need to put each trade aside and focus instead on whether the system wins, not the individual setup you open.
Setup #7
After being stopped out the next signal emitted, as the Heikin Ashi bars reverse from red to green, is on the far right of the charts above, marked 7?. So let's move to more recent charts to see how this and the following trades fared:
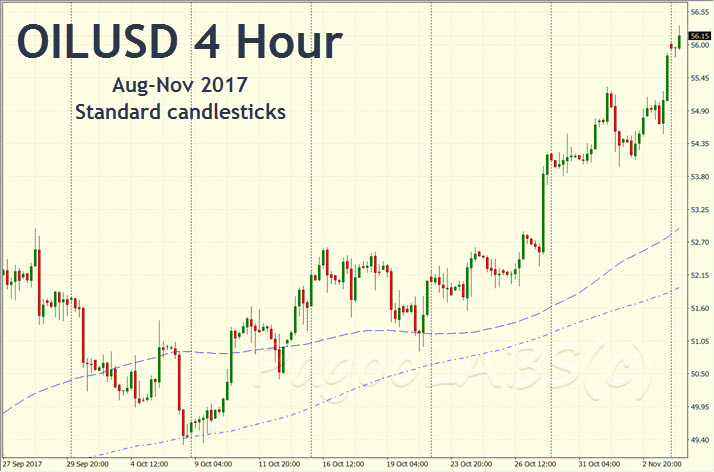
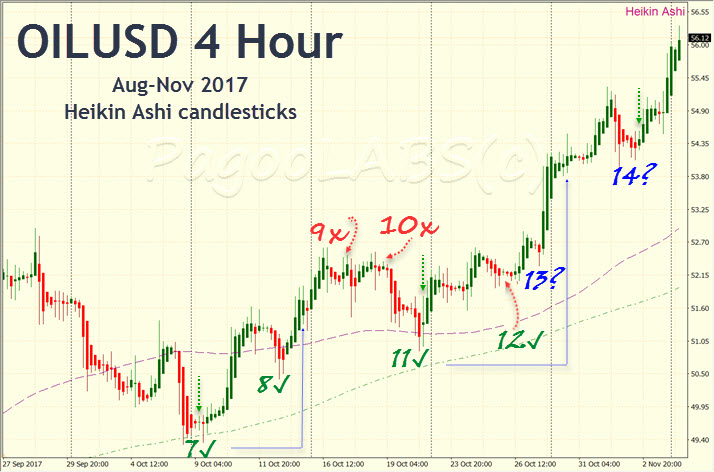
In tabular form, here is the setup for the next signal at setup 7✓:
Setup #7
SL = 49.31              Stop Loss
OP = 49.83              Open Price
CR = TP - SL            Contract Risk
   = 0.52               Risk per contract
TP = OP + RR x CR       TP of 4 x Risk
   = 49.83 + 4 x 0.52
   = 51.91
Add a little for Bid-Ask at close:
   = 51.95
Cumulative win (-loss)
Win = 3%                -1% + 4%
As you can see, the trade was successful and the target price is hit at the point indicated by the blue dotted line extending from the trade open bar. The system is now winning 3%, including the first loss.
The next series of HA reversals up to 11✓ do not meet our filtering criteria. They are either one bar reversals or the retracements are all inside bars. We insist on a minimum retracement of two bars, preferably a few more.
Setup #11
Here's the setup for trade marked 11✓ which also wins:
Setup #7
SL = 50.88              Stop Loss
OP = 51.58              Open Price
CR = TP - SL            Contract Risk
   = 0.70               Risk per contract
TP = OP + RR x CR       TP of 4 x Risk
   = 51.58 + 4 x 0.70
   = 54.38
Add a little for Bid-Ask at close:
   = 54.42
Cumulative win
Win = 7%                3% + 4%
Soon after this winning position closes, there is a little inside bar reversal which is filtered out in this system. Inside bars are widely known continuation patterns and another system might include them after testing, but it's filtered out here.
Setup #14
That brings us to the last setup on the charts, 14?. I annotate it with a question mark to indicate that the trade has yet to complete.
Setup #7
SL = 53.95              Stop Loss
OP = 54.60              Open Price
CR = TP - SL            Contract Risk
   = 0.65               Risk per contract
TP = OP + RR x CR       TP of 4 x Risk
   = 54.60 + 4 x 0.65
   = 57.20
Add a little for Bid-Ask at close:
   = 57.25
Cumulative win
Win = ?                 7% + ?
This has not yet closed so to be as sceptical as possible let's assume it's a loss. We are left with two wins and two losses but the wins are four times each loss, leaving us with a 6% (2 x 4 - 2 x 1) win for the system so far.
Conclusion
Even though the chart had a rocky start with a string of losing setups threateningly lined up, the system itself proved stronger than individual trades.
Many novice traders make the mistake of opening a position like one of those above and then, if it fails, walking away entirely to play another instrument or trying another indicator. When they later revisit that market they are often dismayed to discover they had been right all along and prices had moved in the anticipated direction. With a string of such failures under their belt it is no wonder they often feel the world is against them. In fact they were staring success in the face, and they blinked.
In future stories I will continue to apply the systems approach to tricky situations where every trade does not necessarily win. In the real world of trading you have to approach losses as the cost of playing the game. Never imagine a win proves you are clever or a loss shows you are flawed. Wins and losses prove no such thing, but the work you put into designing and testing your system is everything. Just play the game of odds and become better at it than your opponents.
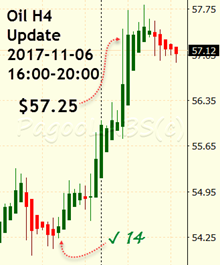
UPDATE: the final trade above did indeed go on to win on November 6th, after the weekend. The system thus wins 11% (3 x 4 - 1 x 1). The success of the system did not depend on winning the final trade, but it's certainly a pleasant bonus. Experienced traders who risk 2% per trade can walk away with over 20% of their risk portfolio in winnings. Congratulations.
Copyright (C) PagooLABS 2017. All Rights Reserved.